| Inhaltsverzeichnis: |
Table of Contens: |
|
|
|
| Ziel dieser Konfigurationsänderung |
Goal of this configuration change |
Ziel dieser Konfigurationänderung ist es
eine durchgehende MTU von 1500 Bytes zu erreichen. ADSL (bezw. PPPoE)
ist momentan das Einzige mir bekannte Transportmedium welches eine
kleinere MTU als 1500 Bytes hat. Dadurch entsteht auf dem ADSL Link
eine Fragmentierung der Datenpakete. Virtuelle Transportmedien wie z.B.
VPN-Tunnels oder IPv6-via-IPv4-Tunnels haben prinzipbedingt eine
tiefere MTU.
Aktuelle Betriebssyteme schicken normalerweise TCP Pakete mit dem
"don't fragment"-Flag gesetzt (wird vom TCP/IP-Stack / Kernel gemacht).
Damit wird gemäss RFC1191
/ Path MTU Discovery versucht, die maximal mögliche MTU auf
dem Weg zum Ziel herauszufinden. Wird nun auf dem Weg die MTU kleiner
als die standardmässigen 1500 Bytes, werden diese Datenpakete
fallen gelassen und es wird dem sendenden Host/Server via ICMP eine
Antwort mit der möglichen MTU gesendet. Sollte nun aber dieser
Host/Server hinter einer Firewall sein, welche ICMP Messages filtert,
erfährt dieser nichts davon und schickt weiterhin Datenpakete mit
1500 Bytes welche beim Zielhost (z.B. dem Kunden hinter ADSL) nie
ankommen.
Dies kann dann z.B. den Effekt haben, dass man von einer Webseite
(welche auf einem Server ist der keine ICMP Messages erhält) den
HTML-Teil erhält (da kleiner als 1500 Bytes), die
dazugehörenden Bilder aber nicht.
Eine gute allgemeine Information zu diesem Thema gibt auch die Website
PMTU (Path MTU) Discovery
(in Englisch).
In der heutigen Zeit sollten eigentlich ICMP Messages nicht mehr
geblockt werden, denn die Zeiten des Ping of Death
sind schon lange vorbei und aktuelle TCP/IP-Stacks sind immun dagegen.
Via ICMP Messages kommen auch andere wichtige Infos wie z.B. "Host
unreachable" oder "No route to host", welche den sendenden Host/Server
eigentlich interessieren sollten.
PPPoA wird nur mit Router und USB-Modems möglich sein, da es keine
Bridge gibt, welche ein ATM-Interface Richtung Computer bietet. Bei
den USB-Modems ist übrigens gerade die Tatsache dass einige nur
ATM sprechen das Problem sie unter Linux oder *BSD zum laufen zu
bringen.
PPPoA wird nicht von allen ISPs unterstützt, entsprechende
Informationen werden gerne per Mail
entgegen genommen und hier in einer Liste zusammenstellt. Es könnte
auch möglich sein, dass es ISPs gibt welche via PPPoE eine MTU
von 1500 Bytes bieten, auch diese Informationen werden in die Liste
aufgenommen.
Die Dokumente Cisco
- PPPoA Baseline Architecture und Cisco
- PPPoE Baseline Architecture for the Cisco UAC 6400 zeigen
noch weitere Unterschiede zwischen PPPoA und PPPoE auf.
|
The goal of this configuration change is to
obtain a constant MTU of 1500 bytes through all hops. ADSL (respective
PPPoE) is currently the only transmission channel known to me with an
MTU smaller than 1500 bytes. This causes fragmentation of data packets
on the ADSL link. Virtual channels, such as VPN tunnels or IPv6-over-IPv4
tunnels, have a lower MTU value by design.
Current operating systems usually send out TCP pakets with the "don't
fragment" flag set (this is done from the TCP/IP stack / kernel).
According to RFC1191 / Path
MTU Discovery, this is done to try out the maximum MTU on the path
to the destination. Is there now somewhere on the way a smaller MTU
then the standard 1500 bytes, the pakets will be dropped and an ICMP
message will be sent to the sending host/server with the possible
MTU. If this host/server now is behind a firewall which filters ICMP
messages, then it will not know about this and will send more pakets
with 1500 bytes which will never arrive at the destination host (eg.
customer behind ADSL).
For example this can have the effect, that from a website (hosted on a
server which don't get the ICMP messages) the HTML part arrived
(smaller then 1500 bytes), but the corresponding pictrures do not.
Good general information about this topic can be found on the website
PMTU (Path MTU) Discovery.
At current times it should not be necessary to block ICMP messages,
because the time of the "Ping of Death" are long over and current
TCP/IP stacks are immune against this attack. With ICMP messages there
are also some other important informations being sent like "Host
unreachable" or "No route to host", which the sending host/server
should care about.
PPPoA support will be limited to Routers and USB-Modems, because there
is no bridge offering an ATM interface on the internal side. By the
way, it is the fact that some USB modems are limited to ATM that
causes trouble with Linux and *BSD support for those modems.
Not all ISPs support PPPoA, please send me your success (or failure)
reports by Mail,
I will compile a list here. It is possible that some ISPs also support
an MTU of 1500 bytes using PPPoE, those will be added to our list as
well.
The documents Cisco
- PPPoA Baseline Architecture and Cisco
- PPPoE Baseline Architecture for the Cisco UAC 6400 show some
more differences between PPPoA and PPPoE.
|
| Internet Service Provider | MTU PPPoE | MTU PPPoA |
| Bluewin | 1492 | 1500 |
| Cyberlink | 1492 | 1500 |
| Cybernet | 1492 | 1500 |
| Dolphins | 1492 | 1492 |
| Easynet | 1492 | 1500 |
| Genotec Internet Consulting | 1492 | 1500 |
| Init Seven | 1492 | 1500 |
| Internet Pipeline | 1492 | 1500 |
| Magnet.ch | 1492 | 1500 |
| Netstream | 1492 | 1500 |
| Solnet | 1492 | 1500 |
| Sunrise | 1492 | 1500 |
| Via Net.Works (Schweiz) | 1492 | 1500 |
| MTU Test vor der Umstellung |
MTU check prior to modifications |
|
Testen der aktuellen MTU von extern mit Hilfe von tracepath (aus
iputils, Linux) vor der Umstellung, dh. mit PPPoE und einer MTU von
1492:
|
Checking the current MTU from a external host using tracepath (from
iputils, Linux) prior to modifications, PPPoE with an MTU of 1492 in
particular:
|
wenk@buckbeak:~$ tracepath batman.home4u.ch
 1?: [LOCALHOST]     pmtu 1500
 1:  rou-hpx-1-phd-hpr.ethz.ch (129.132.189.1)              3.281ms
 2:  rou-ethz-access-mega-transit-2.ethz.ch (129.132.99.213)   3.778ms
 3:  rou-rz-gw-intern.ethz.ch (192.33.92.129)               0.828ms
 4:  swiez2.ethz.ch (192.33.92.11)                          0.883ms
 5:  swiIX1-10GE-1-1.switch.ch (130.59.36.250)              0.952ms
 6:  tix-1.ch.easynet.net (194.42.48.37)                    1.602ms
 7:  fe0-0.br0.htzrh.ch.easynet.net (217.8.192.2)           2.938ms
 8:  fe0-0.dr2.htzrh.ch.easynet.net (217.8.193.68)          2.562ms
 9:  fe0-0.dr2.htzrh.ch.easynet.net (217.8.193.68)        asymm  8   2.446ms pmtu 1492
10:  batman.home4u.ch (217.8.211.226)                      27.415ms reached
     Resume: pmtu 1492 hops 10 back 10
wenk@buckbeak:~$
|
|
| Sollte keine Möglichkeit vorhanden sein
um von extern testen zu können, dann kann auch via die
Path MTU Tester Website (ETH
Zürich, nur mit IPv4) oder via die
Path MTU Tester
Webseite (0x1b.ch, momentan mit max. MTU 1492, unterstützt IPv4
und IPv6, entsprechend der Betriebssystem und Browser Einstellungen)
getestet werden.
|
Should there be no possibility to check
from a outside host, then you could use the
Path MTU Check website (ETH
Zürich, only with IPv4) or use the
Path MTU Check
website (0x1b.ch, currently with max. MTU 1492, supports IPv4 and
IPv6, according to your operating systems and browsers settings)
for testing.
|
| Wird von Aussen auf einen Router welcher NAT/SUA macht mit tracepath
getestet, dann wird nach dem letzten Hop vor diesem Router nur noch
no reply angezeigt. Da tracepath seine Tests der MTU via UDP
macht, werden diese Verbindungsversuche von Aussen auf den Router
welcher NAT/SUA macht verworfen, da diese Datenpakete zu keiner von
Innen aufgebauten Verbindung gehören. In diesem Fall könnte aber
ein Test mit tracepath von Innen auf einen Host ausserhalb funktionieren.
|
If you are checking an NAT/SUA router with
tracepath from the WAN side, you'll get a no reply after the
last hop infront of this router. Because tracepath is checking MTU by
using UDP packets, an NAT/SUA router will discard this traffic, since
there is no connection originating from the inside that's associated
with those packets. If you are experiencing this behaviour, you may
alternatively run tracepath on an internal host, and try to trace a
host outside your network.
|
| Konfigurationsbeispiel ZyXEL Prestige 642R |
Example configuration for ZyXEL Prestige 642R |
|
Andere ZyXEL Prestige Router Modelle dürften wohl ähnlich zu
konfigurieren sein. Dieses Beispiel geht von folgenden Voraussetzungen
aus, sollte sich aber auch auf andere Umgebungen anwenden lassen
(Ausnahme Bridge-Modus):
|
Other Zyxel Prestige routers might offer similar configuration options.
This example assumes the following prerequisites, but you should be
able to adapt it to other environments (exception: bridge mode):
|
- ein geroutetes Netz mit public IP-Adressen (im Beispiel ein /29)
- Router hat eine public IP-Adresse auf dem Ethernet
- Hosts hinter dem Router haben public IP-Adressen
- auskennen mit dem Telnet/Serial Interface des ZyXEL Prestige 642R
|
- a routed Network with public IP-Addresses (Our example uses /29)
- Public IP address on router's ethernet interface
- Hosts behind the router are on public IPs as well
- you should have some experience using the ZyXEL Prestige 642R telnet/serial interface
|
Es ist sicher sinnvoll jetzt von der aktuell laufenden
Router-Konfiguration wiedermal ein Backup zu machen, siehe im Router
Menu 24. System Maintenance / 5. Backup Configuration
(Menu 24.5) oder im Handbuch.
|
It might be a good idea to backup the current configuration on the
router, see router menu 24. System Maintenance / 5.
Backup Configuration (Menu 24.5), or see router's manual.
|
Um die aktuelle Konfiguration für PPPoE nicht zu verlieren im
Menu 11. Remote Node Setup einen freien Punkt nehmen und die
neue Konfiguration für PPPoA machen, im Beispiel ist es Punkt 2:
|
To retain the current configuration, select a free entry in menu
11. Remote Node Setup and create the new configuration for
PPPoA. In our example, its item #2.
|
                           Menu 11 - Remote Node Setup

                     1. PPPoE (ISP)
                     2. ________
                     3. ________
                     4. ________
                     5. ________
                     6. ________
                     7. ________
                     8. ________


                              Enter Node # to Edit:
|
|
Unter Rem Node Name= den Namen der Verbindung (z.B. PPPoA)
angeben, aber momentan Active= auf No
belassen. Die restlichen Einstellungen gemäss Beispiel machen:
|
For Rem Node Name= enter the name of this connection (i.e.
PPPoA), but leave Active= set to No
for now. Adjust all other settings according to this example:
|
                         Menu 11.1 - Remote Node Profile

     Rem Node Name= PPPoA                 Route= IP
     Active= No                           Bridge= No

     Encapsulation= PPP                   Edit PPP Options= No
     Multiplexing= LLC-based              Rem IP Addr= 127.0.0.0
     Incoming:                            Edit IP/IPX/Bridge= No
       Rem Login=
       Rem Password= ********
     Outgoing:                            Session Options:
       My Login= username@provider.ch       Edit Filter Sets= No
       My Password= ********                PPPoE Idle Timeout(sec)= N/A
       Authen= CHAP                         PPPoE Service Name= N/A
                                            Schedule Sets= N/A


                    Press ENTER to Confirm or ESC to Cancel:
|
|
Vom Menu 11.1 - Remote Node Profile mit Edit PPP
Options= Yes zum Submenu wechseln und folgende
Einstellungen anpassen:
Allenfalls muss die Einstellung Encapsulation= Standard PPP
und Compression= No belassen werden da dies abhängig ist
vom beim ISP eingesetzten Router zur Terminierung der PPP Verbindung.
|
In Menu 11.1 - Remote Node Profile, use Edit PPP
Options= Yes to enter the submenu. Adjust the following
settings:
It's possible that you have to keep settings Encapsulation=
Standard PPP and Compression= No. It really depends
on the equipment your ISP uses to terminate the PPP connection.
|
                       Menu 11.2 - Remote Node PPP Options

                    Encapsulation= CISCO PPP
                    Compression= No


                     Enter here to CONFIRM or ESC to CANCEL:

Press Space Bar to Toggle.
|
|
Vom Menu 11.1 - Remote Node Profile mit Edit
IP/IPX/Bridge= Yes zum Submenu wechseln und folgende
Einstellungen anpassen (eigentlich sollte bei Rem IP Addr: 0.0.0.0
stehen, wurde aber beim verwendeten Router nicht akzeptiert):
|
In Menu 11.1 - Remote Node Profile use Edit
IP/IPX/Bridge= Yes to enter the submenu. Adjust settings
as shown below (there should be Rem IP Addr: 0.0.0.0 set, but
the router did not accept this):
|
                  Menu 11.3 - Remote Node Network Layer Options

     VPI/VCI (LLC-mux or PPP/PPPoE Encap):IPX Options:
         VPI #= 8                           Rem LAN Net #= N/A
         VCI #= 35                          My WAN Net #= N/A
     IP Options:                            Hop Count= N/A
       Rem IP Addr: 127.0.0.0               Tick Count= N/A
       Rem Subnet Mask= 0.0.0.0             W/D Spoofing(min)= N/A
       My WAN Addr= 0.0.0.0                 SAP/RIP Timeout(min)= N/A
       Single User Account= No              Dial-On-Query= N/A
       Metric= 2
       Private= No
       RIP Direction= None
         Version= RIP-2B                  Bridge Options:
       Multicast= None                      Dial-On-Broadcast= N/A
       IP Policies=                         Ethernet Addr Timeout(min)= N/A


                     Enter here to CONFIRM or ESC to CANCEL:
|
|
Vom Menu 11.1 - Remote Node Profile mit Edit Filter
Sets= Yes zum Submenu wechseln und folgende Einstellungen
anpassen:
Hier muss beim Input Filter Sets: sowie auch beim
Output Filter Sets: jeweils das Filter Set 4 (PPPoE)
bei den device filters= entfernt werden. Filter Set 7 ist ein
auf lokale Bedürfnisse erstelltes eigenes Set (siehe Anhang: Filter Set 7).
|
In Menu 11.1 - Remote Node Profile use Edit Filter Sets=
Yes to enter the Submenu, and change these settings:
You need to remove Filter Set 4 from both
the Input Filter Sets: and the Output Filter Sets:.
Filter Set 7 is a custom filter set that matches a local
requirement (see Appendix: Filter Set 7).
|
                         Menu 11.5 - Remote Node Filter

                    Input Filter Sets:
                      protocol filters= 7
                        device filters=
                    Output Filter Sets:
                      protocol filters=
                        device filters=


                     Enter here to CONFIRM or ESC to CANCEL:
|
|
Ist dies auch angepasst sollten die Einstellungen gespeichert
werden. Beim verwendeten Router wurde beim verlassen von Menu 11.1
leider auch die bestehende PPPoE Verbindung getrennt, scheint eine
Unschönheit in der Firmware zu sein.
Im Menu 11 wird bei der inaktiven Verbindung vor dem Namen ein
- angezeigt, dh. 1. PPPoE (ISP) ist die momentan
aktive Verbindung:
|
Once these changes are made, you should save your settings.
Unfortunately the router did disconnect the PPPoE session after
quiting Menu 11.1. This looks like a quirk in the firmware.
Menu 11 prefixes the inactive connection with a -. This
means that 1. PPPoE (ISP) is currently active:
|
                           Menu 11 - Remote Node Setup

                     1. PPPoE (ISP)
                     2. -PPPoA
                     3. ________
                     4. ________
                     5. ________
                     6. ________
                     7. ________
                     8. ________


                              Enter Node # to Edit:
|
|
Soweit sind nun die Konfiguration-Einstellungen abgeschlossen. Im
nächsten Kapitel wird nun endlich auf PPPoA umgeschaltet.
|
Configuration modifications are now complete. The next chapter shows
you how to activate your newly created PPPoA connection.
|
| Umschalten zu PPPoA mit ZyXEL Prestige 642R |
Enabling PPPoA on ZyXEL Prestige 642R |
|
Falls nun alles richtig eingestellt ist (allenfalls nochmal
kontrollieren), kann die Umstellung gemacht werden. Dazu geht man
wieder ins Menu 11. und wählt 1. PPPoE (ISP) aus:
|
If everything is set correctly (double check if neccessary),
you can now switch over to PPPoA. Go back to Menu 11. and select
1. PPPoE (ISP):
|
                           Menu 11 - Remote Node Setup

                     1. PPPoE (ISP)
                     2. -PPPoA
                     3. ________
                     4. ________
                     5. ________
                     6. ________
                     7. ________
                     8. ________


                              Enter Node # to Edit:
|
|
Die aktiven PPPoE Verbindung deaktivieren durch umstellen bei
Active= von Yes auf No, und
mit speichern verlassen.
|
Disable the currently active PPPoE connection by switching
Active= from Yes to No, then
save and quit.
|
                         Menu 11.1 - Remote Node Profile

     Rem Node Name= PPPoE                 Route= IP
     Active= No                           Bridge= No

     Encapsulation= PPPoE                 Edit PPP Options= No
     Multiplexing= LLC-based              Rem IP Addr= 0.0.0.0
     Incoming:                            Edit IP/IPX/Bridge= No
       Rem Login=
       Rem Password= ********
     Outgoing:                            Session Options:
       My Login= username@provider.ch       Edit Filter Sets= No
       My Password= ********                PPPoE Idle Timeout(sec)= 0
       Authen= CHAP                         PPPoE Service Name= any
                                            Schedule Sets= 1


                    Press ENTER to Confirm or ESC to Cancel:
|
|
Nun im Menu 11 - Remote Node Setup die neu erstellte PPPoA
Verbindung auswählen und dort Active= von No auf
Yes umstellen und ebenfalls mit speichern verlassen.
|
Now select in Menu 11 - Remote Node Setup the newly added
PPPoA Connection, and switch there Active= from No
to Yes. Again, save and quit.
|
                         Menu 11.1 - Remote Node Profile

     Rem Node Name= PPPoA                 Route= IP
     Active= Yes                          Bridge= No

     Encapsulation= PPP                   Edit PPP Options= No
     Multiplexing= LLC-based              Rem IP Addr= 127.0.0.0
     Incoming:                            Edit IP/IPX/Bridge= No
       Rem Login=
       Rem Password= ********
     Outgoing:                            Session Options:
       My Login= username@provider.ch       Edit Filter Sets= No
       My Password= ********                PPPoE Idle Timeout(sec)= N/A
       Authen= CHAP                         PPPoE Service Name= N/A
                                            Schedule Sets= N/A


                    Press ENTER to Confirm or ESC to Cancel:
|
|
Im Menu 24. System Maintenance / 1. System Status
(Menu 24.1) kontrollieren, denn nun sollte die zweite Verbindung
online gehen.
|
Enter Menu 24. System Maintenance / 1. System Status
(Menu 24.1) and check the status display, you should see the new PPPoA
connection coming up.
|
                     Menu 24.1 - System Maintenance - Status

Node-Lnk Status      TxPkts      RxPkts      Errors  Tx B/s  Rx B/s     Up Time
 1       N/A       73169911    76265973           0       0       0     0:00:00
 2-PPP   Up        23795989    24036699           0     468     206   528:45:58
 3       N/A              0           0           0       0       0     0:00:00
 4       N/A              0           0           0       0       0     0:00:00
 5       N/A              0           0           0       0       0     0:00:00
 6       N/A              0           0           0       0       0     0:00:00
 7       N/A              0           0           0       0       0     0:00:00
 8       N/A              0           0           0       0       0     0:00:00


    Ethernet:                                    WAN:
      Status: 100M/Full Duplex Tx Pkts: 95086229   Line Status: Up
      Collisions: 0            Rx Pkts: 94366040   Upstream Speed:   640 kbps
    CPU Load =    2.56%                            Downstream Speed:   768 kbps
                                 Press Command:
                      COMMANDS: 1-Reset Counters  ESC-Exit
|
|
Falls es nicht klappt im Menu 24. System Maintenance /
3. Log and Trace / 1. View Error Log (Menu 24.3.1)
im Logfile nachsehen.
Allenfalls auch via Menu 24. System Maintenance /
8. Command Interpreter Mode mit ip route status die
Routingtabelle ansehen:
|
If it doesn't work, switch to Menu 24. System Maintenance /
3. Log and Trace / 1. View Error Log (Menu 24.3.1)
and check the logs.
Alternatively, use Menu 24. System Maintenance /
8. Command Interpreter Mode to check the routing table by
issuing ip route status.
|
gate.home> ip route status
Dest            FF Len Interface  Gateway         Metric stat Timer  Use
217.8.195.25    01 32  wanif1     217.8.195.25      1    03a9 0      0
217.8.211.224   00 29  enif0      217.8.211.225     1    041b 0      80319828
default         01 0   wanif1     PPPoA             2    00ab 0      8528673
gate.home>
|
|
Durch Umkehrung der letzten beiden Schritte kann nun jederzeit
zwischen PPPoE und PPPoA umgeschaltet werden.
|
By reversing the last two steps, you can now switch between PPPoE
and PPPoA at any time you want.
|
| Konfiguration von PPPoE und PPPoA mit Cisco IOS |
Configuration of PPPoE and PPPoA with Cisco IOS |
Cisco Router mit einem ATM Interface können mit PPPoA betrieben
werden. In diesem Fall konfigurieren wir einen Cisco
836 welcher für ADSL über ISDN geeignet ist. Cisco Router
können auch über Ethernet hinter einer Bridge den PPPoE
Datenstrom auspacken - dies ist jedoch nicht im Rahmen dieser
Beschreibung.
Das Cisco Router Web Setup Tool (CRWS) ist leider nicht in der
Lage, eine für die Schweiz verwendbares PPPoA Setup aufzubauen.
Folgende Konfiguration muss daher "von Hand" über die Konsole
erfolgen.
Das linke Muster zeigt eine PPPoE Verbindung. Wir sehen die
begrenzte MTU von 1452 Bytes, welche durch die Enkapsulierung der
Pakete notwendig ist.
Das rechte Muster zeigt eine PPPoA Verbindung. In diesem Fall
beträgt die MTU 1500 Bytes und wir müssen keinerlei
Beschränkungen auf den Ethernetinterfaces konfigurieren:
|
Cisco routers containing an ATM interface could be operated with
PPPoA. In our example, we configure a Cisco
836 which is suitable for ADSL over ISDN. You could also
attach a Cisco router over Ethernet to a bridge and unpack the
PPPoE datastream - this is not the scope of this document.
The Cisco Router Web Setup Tool (CRWS) is not able to create a
running PPPoA configuration for Swiss ADSL. The following
commands must be entered over the console.
The left example shows a PPPoE connection. You will see the
limited MTU of 1452 bytes, which is given by the encapsulation of
the packets.
The right example shows a PPPoA connection. In this case the MTU is
1500 bytes and we need no limit of the MTU on the ethernet interface:
|
!
! Sample PPPoE setup
!
ip tcp mss 1412
!
interface Ethernet0
 ip address 192.0.2.1/24
 ip virtual-reassembly
 ip tcp adjust-mss 1452
!
interface ATM0
 no ip address
 atm vc-per-vp 64
 no atm ilmi-keepalive
 dsl operating-mode etsi
 pvc 8/35
  pppoe-client dial-pool-number 1
 !
!
interface Dialer1
 ip address negotiated
 no ip proxy-arp
 ip mtu 1492
 encapsulation ppp
 dialer pool 1
 dialer-group 1
 ppp authentication chap callin
 ppp chap hostname me@example.net
 ppp chap password 7 ******************
!
|
!
! Sample PPPoA setup
!
interface Ethernet0
 ip address 192.0.2.1/24
!
interface ATM0
 no ip address
 atm vc-per-vp 64
 no atm ilmi-keepalive
 dsl operating-mode etsi
 pvc 8/35
  encapsulation aal5snap
  protocol ppp dialer
  dialer pool-member 1
 !
!
interface Dialer1
 ip address negotiated
 no ip proxy-arp
 encapsulation ppp
 dialer pool 1
 dialer-group 1
 ppp authentication chap callin
 ppp chap hostname me@example.net
 ppp chap password 7 ******************
!
|
|
| Konfiguration von PPPoA mit FreeBSD |
Configuration of PPPoA with FreeBSD |
Wird ein ADSL-Router oder -Modem im sogenannten Bridge Modus
betrieben, dann gibt es unter FreeBSD auch einige Möglichkeiten.
Konfigurationsbeispiele finden sich im FreeBSD
Handbuch
im Kapitel 25.6 PPP over ATM (PPPoA).
Es ist unbekannt ob diese Möglichkeiten in der Schweiz
funktionierten, Rückmeldungen
sind willkommen.
|
If a ADSL router or modem is used in the so called bridge modus, then
there are also some possibilities for FreeBSD. Configuration examples
are in the FreeBSD
Handbook
in the 25.6 Using PPP over ATM (PPPoA)
chapter.
It is unknown if this solutions do work in Switzerland,
feedback
is welcome.
|
| MTU Test nach der Umstellung |
MTU check after modifications |
|
Hat alles geklappt, und die Verbindung ist mit PPPoA online kann man
von extern wieder mit tracepath, oder via
Path MTU Tester Website (ETH
Zürich, nur mit IPv4) oder via
Path MTU Tester
Webseite (0x1b.ch, momentan mit max. MTU 1492, unterstützt IPv4
und IPv6) testen:
|
Once the PPPoA connection is online, you can run tracepath, or use
Path MTU CheckWebsite (ETH
Zürich, only with IPv4) or use
Path MTU Check
website (0x1b.ch, currently with max. MTU 1492, supports IPv4 and
IPv6) once more, again from an external host:
|
wenk@buckbeak:~$ tracepath batman.home4u.ch
 1?: [LOCALHOST]     pmtu 1500
 1:  rou-hpx-1-phd-hpr.ethz.ch (129.132.189.1)              1.582ms
 2:  rou-ethz-access-mega-transit-2.ethz.ch (129.132.99.213)   0.827ms
 3:  rou-rz-gw-intern.ethz.ch (192.33.92.129)               0.816ms
 4:  swiez2.ethz.ch (192.33.92.11)                          0.849ms
 5:  swiIX1-10GE-1-1.switch.ch (130.59.36.250)              1.618ms
 6:  tix-1.ch.easynet.net (194.42.48.37)                   14.452ms
 7:  fe0-0.br0.htzrh.ch.easynet.net (217.8.192.2)           2.173ms
 8:  fe0-0.dr2.htzrh.ch.easynet.net (217.8.193.68)          2.637ms
 9:  gate.home4u.ch (217.8.211.225)                       asymm 10  26.234ms
10:  batman.home4u.ch (217.8.211.226)                      27.144ms reached
     Resume: pmtu 1500 hops 10 back 10
wenk@buckbeak:~$
|
|
|
Nun sollte die MTU durchgehend auf 1500 sein.
|
You should now be able to observe a constant MTU of 1500.
|
| Anhang: Filter Set 7 |
Appendix: Filter Set 7 |
|
Mit der Rule 1 wird der Traffic auf die Broadcast IP (217.8.211.231)
meines Subnnetz geblockt, da dieser Traffic vom Router aufs LAN
durchgereicht wird. Mit Rule 2, 3 und 4 wird ftp (tcp/21), telnet
(tcp/23) und snmp (udp/161) auf die IP des Routers geblockt. Da dieser
Filter nur als Input Filter verwendet wird ist somit der Zugriff von
"Aussen" geblockt, aber von intern weiterhin möglich.
|
Rule 1 blocks broadcast traffic to my Subnet (217.8.211.231), because
the router is passing that traffic to the LAN. Rule 2, 3 and 4 block
ftp (tcp/21), telnet (tcp/23) and snmp (udp/161) to the router's IP.
Because this filter is an Input Filter, only traffic originating from
the WAN side gets blocked. Internal users (and admins ;) still can
connect.
|
                        Menu 21.7 - Filter Rules Summary

 # A Type                       Filter Rules                              M m n
 - - ---- --------------------------------------------------------------- - - -
 1 Y IP   Pr=0, SA=0.0.0.0, DA=217.8.211.231                              N D N
 2 Y IP   Pr=6, SA=0.0.0.0, DA=217.8.211.225, DP=21                       N D N
 3 Y IP   Pr=6, SA=0.0.0.0, DA=217.8.211.225, DP=23                       N D N
 4 Y IP   Pr=17, SA=0.0.0.0, DA=217.8.211.225, DP=161                     N D F
 5 N
 6 N


                  Enter Filter Rule Number (1-6) to Configure:
|
|
| Anhang: Screenshot ZyXEL Prestige 650R |
Appendix: Screenshot ZyXEL Prestige 650R |
                         Menu 4 - Internet Access Setup

                    ISP's Name= MyISP
                    Encapsulation= PPPoA
                    Multiplexing= LLC-based
                    VPI #= 8
                    VCI #= 35
                    ATM QoS Type= UBR
                      Peak Cell Rate (PCR)= 0
                      Sustain Cell Rate (SCR)= 0
                      Maximum Burst Size (MBS)= 0
                    My Login= username@provider.ch
                    My Password= ********
                    Idle Timeout (sec)= 1500
                    IP Address Assignment= Dynamic
                      IP Address= N/A
                    Network Address Translation= SUA Only
                      Address Mapping Set= N/A

                    Press ENTER to Confirm or ESC to Cancel:
|
|
|
                     Menu 24.1 - System Maintenance - Status           22:54:30
                                                             Tue. Mar. 29, 2005

Node-Lnk Status      TxPkts      RxPkts      Errors  Tx B/s  Rx B/s     Up Time
 1-PPPoA Up         1136701     1847342           0       0       0     0:01:32
 2       N/A              0           0           0       0       0     0:00:00
 3       N/A              0           0           0       0       0     0:00:00
 4       N/A              0           0           0       0       0     0:00:00
 5       N/A              0           0           0       0       0     0:00:00
 6       N/A              0           0           0       0       0     0:00:00
 7       N/A              0           0           0       0       0     0:00:00
 8       N/A              0           0           0       0       0     0:00:00

My WAN IP (from ISP): ??.77.164.??

    Ethernet:                                    WAN:
      Status: 100M/Full Duplex Tx Pkts: 1761969    Line Status: Up
      Collisions: 0            Rx Pkts: 1052912    Upstream Speed:   256 kbps
    CPU Load =   17.72%                            Downstream Speed:  1536 kbps
                                 Press Command:
                      COMMANDS: 1-Reset Counters  ESC-Exit
|
|
| Anhang: Screenshot ZyXEL Prestige 660HW |
Appendix: Screenshot ZyXEL Prestige 660HW |
                Mode:                        Routing
                Encapsulation:               PPPoA
                Multiplexing:                LLC
                VPI/VCI:                     8/35
                UserName:                    username@provider.ch
                Passwort:                    ********
                IP Address:                  Obtain an IP Address Automatically
                Network Address Translation: SUA Only
                Connection:                  Nailed-Up Connection
|
|
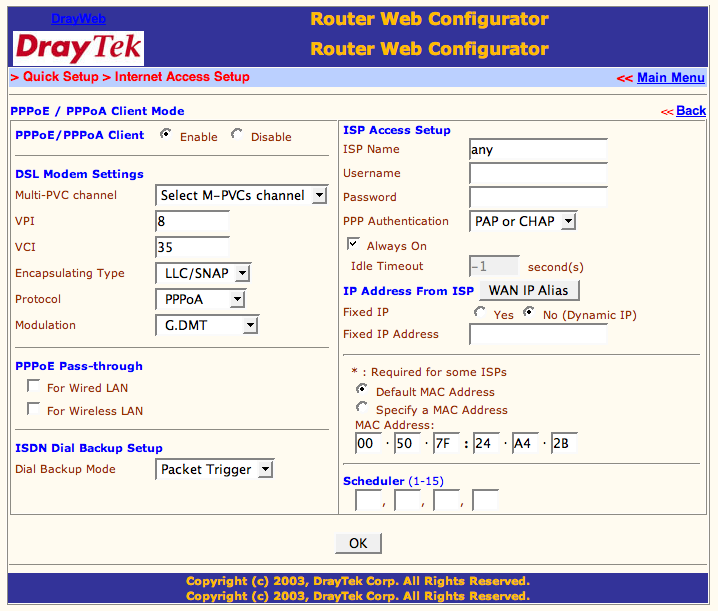
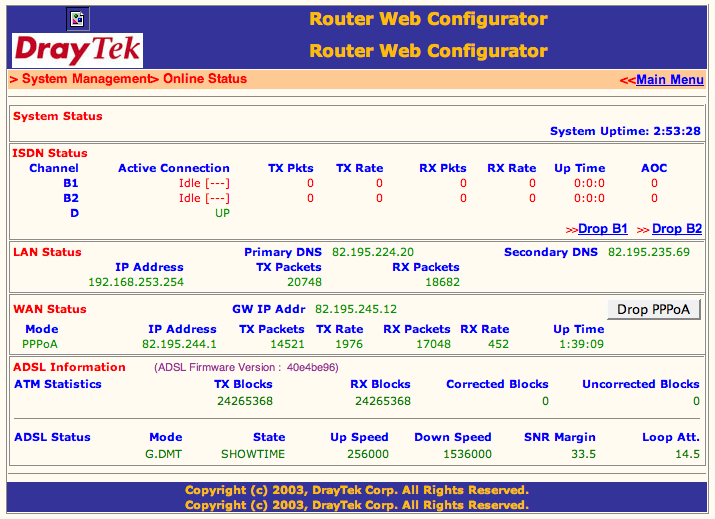
| Anhang: Screenshot DrayTek Vigor2600VGi |
Appendix: Screenshot DrayTek Vigor2600VGi |
| Anklicken für grösseres Bild |
Click for larger image |
|
|
| Bei den Modellserien 2600 und 2800 mit neureren Versionen
der Firmware muss zusätzlich via telnet noch wan ppp_mss 1500
eingegeben werden. |
On the 2600 and 2800 series with newer firmware version
it is also needed to enter wan ppp_mss 1500 through the telnet
interface. |
|